|
|
|
|
News About Features Press Download Docs - Wiki - Installation - Upgrading - Media - Readme - Privacy - Developers Support Edit Online Contributing |
Style Guide
This guide will help you customize the look and feel of your phpGedView site. All files referenced in this style guide come from the themes directories and are designed such that you may make changes to them however you wish without disrupting the programming of phpGedView, though there may be some PHP code included in the files. An understanding of CSS stylesheets and HTML is required to customize the site. Some understanding of PHP might also be helpful. Style Guide Contents Steps to Customize your Theme
These sections are displayed graphically here in the following image (from themes/standard/):
PhpGedView uses CSS stylesheets extensively throughout the site. All stylesheets are controlled by the file style.css. These stylesheets give you a great deal of flexibility over the graphical layout, colors, fonts, borders, etc of the site. Play around and see what you can make it do. If you come up with something creative, then share it with the rest of the community. The following sections describe what each style class defined in style.css graphically corresponds to on the pages. This image corresponds to the pedigree chart and the descendancy
chart. The .pedigree_image_portrait is sometimes replaced by
.pedigree_image_portrait_rtl, .pedigree_image_landscape, or
.pedigree_image_landscape_rtl depending on language and if the view is in
landscape or portrait mode. The .name1 and .details1 classes can also be
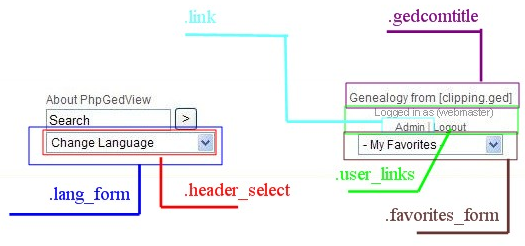
replaced by .namezoom and .detailszoom when user zooms in. This image shows the stylesheets applied to the header portion of the
page. If the languages are shown as flags then the class would be .flag
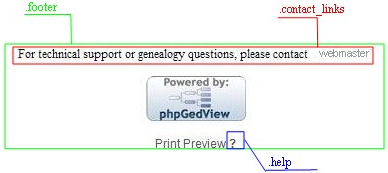
instead of the .header_select. This image shows the stylesheets applied to the footer portion of the
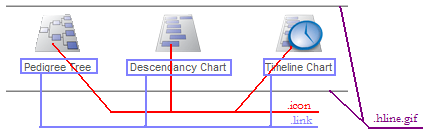
page. The following stylesheets are in the toplinks.html section of the page: .menuitem, .menuitem_hover, .submenu, .submenuitem, and .submenuitem_hover. This image shows the stylesheets applied to the default top
navigational links. This image shows the list table stylesheets. List tables are
found on the individual list, family list, source list, place hierarchy
and multimedia list pages. This image shows the stylesheets applied to the individual's details
section. The .facts_label will be .facts_labelred if the fact has been
deleted. The .facts_label will be .facts_labelblue if the fact has been
added/modified. This is also how .facts_value is changed to either
.facts_valuered or .facts_valueblue. The .source_citations stylesheet is
used when source citations are shown in the facts, see plus (+) sign. The .error stylesheet is when error messages are shown and the .warning stylesheet is when the warning messages are shown. The .news_date and .news_title stylesheets are used on the Welcome Page. The .current_day stylesheet is used on the anniversary calendar in month view. The .listlog stylesheet is used when viewing log file under admin menu. The .label stylesheet is used on the search form in addition to other places. The .formfield stylesheet is used on the login form. The Edit GEDCOM privacy contains .facts_label02, .facts_label03, and .facts_value02 stylesheets. The following stylesheets are in the timeline chart: .field, .timeline_table, .person0, .person1, .person2, .person3, .persion4, and .person5.
With the introduction of PhpGedView v3.0 a new drop-down menuing system was introduced into the themes. This menu system was designed to be flexible and easy to change without designers having to know anything about the javascript and DHTML that drives it. You are free to change the menus however you want, or to use your own menu style if you don't want to use the menu system provided. The menu system is driven by a PHP array structure that you build up in the page and then pass to the print_menu() function. Following is a description and documentation about each of the elements in the menu array. A basic menu array looks like this (copied from the in code documentation of the print_menu function): $menu["label"] = "Charts"; $menu["labelpos"] = "down"; // tells where the text should be positioned relative to the picture options are up down left right $menu["icon"] = "images/pedigree.gif"; $menu["hovericon"] = "images/pedigree2.gif"; $menu["link"] = "pedigree.php"; $menu["class"] = "menuitem"; $menu["hoverclass"] = "menuitem_hover"; $menu["flyout"] = "down"; // options are down left and right $menu["items"] = array(); // an array of like menu itemsThe $menu["label"] item of the menu array is set to the text label for the menu. In the example above this would be "Charts". The $menu["labelpos"] is the position of the label text relative to the menu's icon. The options are: "up" - place text above the icon, "down" - place text below icon, "left" - place text to the left of the icon, "right" place text to the right of the icon. The default is "down". $menu["icon"] is the relative path to the image that you want to use as the icon. If you leave out the "icon" index, then no image icon will be used, and the menu will just be a text menu. $menu["hovericon"] is the relative path to the image that will be used when the user mouses over the menu. This will allow you to have mouseover effects. $menu["link"] is the url where the user should be taken if they click on the menu. $menu["class"] is the CSS stylesheet that should be used in the class attribute for the menu's containing $menu["hoverclass"] is the CSS stylesheet to apply when the user mouses over the menu item. $menu["flyout"] is the position where any submenus should appear relative to this menu item. The options are: "down" - the submenus will appear below the menu item, "right" - the submenus will appear to the right of this menu, and "left" - the submenus will appear to the left of this menu. $menu["items"] is also an array containing menu item arrays. This is where all of the submenu items go that will appear when the user mouses over the menu item. Following is a basic example of how to create a menu with 1 submenu item. More complicated menu examples can be found in the toplinks.html files for the different themes. $menu = array(); $menu["label"] = "Simple Menu"; $menu["class"] = "menuitem"; $menu["items"] = array(); $submenu = array(); $submenu["label"] = "Menu Item 1"; $submenu["class"] = "submenuitem"; $menu["items"][] = $submenu; print_menu($menu);The $menu array will print the text that appears on the screen. The $submenu array is for the first item that will appear when the user mouses over the $menu["label"] text. The line $menu["items"][] = $submenu; is a PHP construct to append an item to the end of an array. So you could create as many new submenus as you need and continually append them to the $menu["items"] array in the order you want them to appear. Now since a submenu item has the same array structure as the main menu item, you can have any level of menu hierarchies. You would just add a $subsubmenu array to an items array. $submenu["items"][] = $subsubmenu; Multiple hierarchies have not undergone any rigerous testing and are not present in any of the released code. So they should be used with caution.
Copyright © 2009 PhpGedView Team Members
|